RADS.110 Radiographic Procedures I

COURSE DESCRIPTION:

The course begins with a unit of instruction on general anatomy and radiographic positioning terminology/nomenclature.  The course then introduces the beginning radiography student to a study of the anatomical structures and basic functions that relate to the:  radiographic examination of the chest for heart and lungs (thoracic viscera), the abdomen (digestive, biliary and urinary systems) and the  upper extremities.  Principles of radiographic positioning and procedures involved in the preparation, examination and evaluation of the aforementioned anatomical structures, are presented for student learning. Units of instruction also include mobile radiography, pediatric radiography, geriatric radiography and trauma radiography.

Prerequisite:  Admission into the Radiography Program

human body - boy

Unit 1 Examination Review

  • read/review Chapter 3 of Merrill's
  • read/review Mallett pgs. 4 and 5
  • review homework assignment from workbook
  • complete Chapter 44 of The Integrated Radiography Workbook (DeAngelis) and review the question explanations at the end

Know opposites:  proximal - distal, inversion - eversion, pronation - supination, internal - external, recumbent - erect (upright), medial - lateral, vertical - horizontal, ventral - dorsal

A plane dividing the body in anterior and posterior sections is a coronal plane (equal anterior and posterior = midcoronal)

A plane dividing the body in superior and inferior portions = transverse (horizontal plane)

A plane dividing body into right and left sections is a sagittal plane (equal right and left = midsagittal plane (MSP)  )

body habitus = classification of an individual's size/shape

     asthenic - thin  - stomach long and vertical, colon in pelvis, lungs long

     hypersthenic  -  large/massive build  -  stomach - high and transverse, colon along periphery of abdomen, lungs broad and short

ventral decubitus - patient is prone

dorsal decubitus - patient is supine

anatomical position - patient standing with palms facing forward

proximal - towards point of attachment (i.e. the elbow is proximal, the wrist is distal)

distal - away from point of attachment (i.e. the ankle is distal, the knee is proximal)

extension - increase angle of joint

flexion - decreases angle of joint

tangential projections - central ray skims a body part

towards the midline of the body = medial

away from the midline of the body = lateral

projection = path of the x-ray beam from tube through the patient's body to the IR

abduction - moving arm away from central axis of body

adduction - moving arm towards central axis of body

RAO/LAO position = PA oblique projection

RPO/LPO position = AP oblique projection

decubitus projections require the x-ray beam to be horizontal, used to demonstrate air/fluid levels

Trendelenburg - head lower than the feet

lordotic = AP projection with superior chest tilted back towards bucky

 Study Hard!  Good Luck!!!

Unit  -  Anatomy and Positioning of the Respiratory System

Unit Learning Objectives  -  Anatomy and Positioning of the Thoracic Viscera

At the completion of this unit, the student will be able to:

1.             List the structures constituting the airway through which oxygen will pass as it travels from the mouth/nose to the distal aspects of the lungs.

                - Identify structures on anatomical drawings.

2.             Name the structure serving as a common passageway for both food and air and be able to list the individual anatomical parts.

3.             List the skeletal landmarks associated with certain organs of the respiratory system.

4.             Identify which bronchus food particles are more likely to enter and list the reason why.

5.             List the number of lobes in each lung and identify their correct names.

6.             Identify which hemidiaphragm is higher and list the reason why.

7.             Identify on drawings, the major anatomical portions of the lungs in both a frontal and lateral

                position.

8.            Identify the correct term describing the space in the thoracic cavity between the lungs and list the

                various organs contained within this space.

9.            Identify the correct term used to describe the double walled membrane enclosing each lung and its various parts.

10.          List the functional unit of the lung.

11.          Define “fissures” and be able to locate the oblique and horizontal fissures of the lung.

12.          Understand the basic physiology of respiration.

13.          Given a definition, identify the following terms:      atelectasis

                                                                                               bronchiectasis

                                                                                               bronchitis

                                                                                               laryngitis

                                                                                               pneumonitis

                                                                                               bronchopneumonia

                                                                                               pleurisy

                                                                                               pleural effusion

                                                                                               empyema

                                                                                               hemothorax

                                                                                               pneumothorax

                                                                                               tracheotomy

                                                                                               lobectomy

                                                                                               pneumonectomy

                                                                                               thoracocentesis

14.          Identify those parts of the bony thorax which are present in chest radiography.

15.          List the number of ribs which should be present/demonstrated above the diaphragm on a well positioned P.A. chest radiograph.

16.          List various reasons why chest radiographs should be taken with the patient in an upright position, whenever possible.       

17.          Describe/identify motion on a chest radiograph.

18.          Explain why a 72 inch SID is desirable for chest radiography.

19.          List the routine chest projections done at most institutions.

20.          Understand the importance of full inspiration for chest radiography.

21.          Understand the importance of inspiration/expiration films on a patient with a suspected

              pneumothorax.

22.          List the radiation protection measures which should be utilized in chest radiography.

23.          Identify the CR location for a properly positioned PA/Lat. chest.

24.          List various questions which should be asked of the patient before chest radiography.

25.          Understand why a left vs. a right lateral projection is desirable.

26.          List the primary side of interest for chest obliques.

27.          List the amount of pt. obliquity for properly positioned chest obliques.

28.          Describe/understand the importance of the following special chest positions:  decubitus and lordotic                                                                                                                                                            

29.          Successfully pass a laboratory competency examination for chest radiography.

30.          Understand all lectured and required reading materials, pertinent to this unit.

Respiratory System Anatomy

Great website to review respiratory system anatomy -

http://www.getbodysmart.com/ap/respiratorysystem/menu/menu.html

Click to view

Path of air as it travels proximal to distal in the respiratory tract:

Nasal cavities>pharynx (oro-, naso-, laryngo-)>larynx>trachea>primary (main) bronchi>lobar bronchi>segmental bronchi>bronchioles>alveoli

The alveoli are the functional units of the lungs where the physiology of respiration actually occurs.

Right lung has three lobes, whereas the left only has two.

The right lung has two fissues (oblique and horizontal) separating it into the right superior lobe, right middle lobe and right inferior lobe.

The left lung has only the oblique fissure separating it into the left superior lobe and left inferior lobe.

Parietal pleura - lines the chest cavity

Visceral pleura - covers the lungs directly

pleural cavity - between parietal and visceral pleura

apex of lung = superior portion

base of lung = inferior portion

hilum = medial portion

costophrenic angle (CPA) = outer lower corners of lungs where inner surface of lower chest wall and diaphragm are in contact


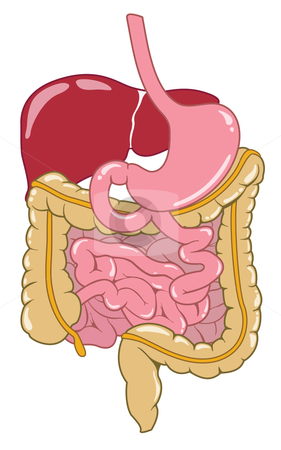
Unit  -  Anatomy and Positioning of the Abdomen

Unit Objectives  -  Anatomy and Positioning of the Abdomen

At the completion of this unit, the student will be able to:

1. Identify on drawings and radiographs, the anatomy of the principle organs and structures of the digestive system, liver and biliary systems, pancreas, spleen, urinary system and      adrenal glands.

2. Localize all organs as identified in objective #1 to one of four quadrants of the abdomen.

3. Identify and describe the position of the important bony landmarks used in positioning for the abdomen.

4. Describe the relationship of the bony landmarks to other skeletal structures.

5. List and describe the muscles of the abdomen.

6. List those structures which should be visible (in reference to soft tissue differentiation) on a correctly exposed abdominal radiograph.

7. Identify two bony landmarks which should be used to position a supine and prone abdomen.

8. Divide the abdomen into nine regions and be able to name each region.

9. Simulate an abdominal radiographic examination.

10. List various types of pathology which would indicate a need for an obstruction series/ three-way abdomen/acute abdomen series/free-air series.

11. Identify which lateral decubitus should be taken if there is a question of free air in the abdominal cavity.

12. Given diagrams and/or radiographs of various body habiti, identify the type according to Mill’s classifications.

13. Briefly explain the term KUB and Flat-plate of the abdomen.

14. List the IR size and direction of each IR for the following examinations of the abdomen: supine and free air series.

15. Identify the structures on each projection of the examinations listed above.

16. List various steps involved in positioning the body for each projection of the above listed abdominal examinations.

17. List various protective measures employed to reduce radiation exposure to the patient during these examinations.

18. Record various questions that a patient must be asked in order to obtain a thorough history.

19. List the reasons why a patient should void prior to a radiographic examination of the abdomen.

20. Record the desired scale of contrast for abdominal examinations.

21. List the structures which are demonstrated when an abdomen in the lateral position is taken.

Digestive System Anatomy

Great websites/videos to review digestive system anatomy

http://www.acm.uiuc.edu/sigbio/project/digestive/index.html

http://www.youtube.com/watch?v=MVt9dW0c9FM

http://www.youtube.com/watch?v=Z7xKYNz9AS0&feature=related

Pediatric Radiography 2-4-07-15ga.jpg

 Essential to success with pediatric patients:

-Understanding that children are not small adults

-Appreciating their need to be approached at their level
 
Two main areas of problems in radiographer confidence:
-Communication skills
-Immobilization techniques
 
Research has shown that atmosphere of patient care affects recovery rate
Pediatric centers should provide an atmosphere that is appealing and pleasing to children of all ages
Areas to consider
  -  Waiting room
  -  Imaging room

 Provide distractions to reduce anxiety:

- Gender-neutral toys and activities
- Books and magazines that appeal to various age groups
- Video or television
 
-Lengthy examinations pass quickly with age-appropriate music or videos playing
-Prepare room before child enters
-Dimmed or dark rooms frighten younger children
-Provide explanation and reassurance if room must be dim for procedure
 
Two patients are usually dealt with:
- Parent
- Child
If child is old enough to comprehend, speak directly to child
Use age-appropriate language at his/her eye level
Parent will listen and appreciate special attention given to child
 
If child is too young to understand, explain examination to parent
-Use lay terms and simple sentences
-Parents are often stressed and distracted
-Simple instructions will aid understanding
 
Fear may be cause of agitation
-Remain calm
-Speak in a soothing voice
-Introduce yourself and escort to private area
- Avoid upsetting others in waiting room
-Listen to concern without interruption
-Provide explanation and comfort
 

Parent Participation:

Depends on:

-  Department philosophy or protocols
-  Wishes of parent and patient
-  Laws of province or state regarding radiation protection
-  Usually better if only one parent helps
-  Prevents overcrowding in room
 
Advantages:
-  Parent can watch child if radiographer and radiologists need to attend to equipment, contrast, IR, etc.
-  Radiographer may need to leave room
-  Parent can assist with immobilization
-  Parent who witnesses procedure cannot doubt professional conduct
- Prepared pamphlets useful in providing essential instructions and information about procedure
   -  Also answers many common questions
Always provide radiation protection and explain need for it
 
Approaching the Child
 -  Greet parent and patient with warm smile
 - Talk to child at their eye level
 - Introduce yourself and confirm you have correct patient
 -  State briefly what you are going to do
Suggest child come with you to help with some pictures
  -  Asking allows child to refuse
Use sincere praise
-  Immediate praise needed for young child (age 3-7)
•Example: “You were very still. Thank you!”
Employ distraction techniques
-  Ask about school, sports, siblings, pets, etc.
-  Become familiar with popular cartoons, TV shows, music, sports figures, etc.
-  Knowledge of their world builds rapport
 
Answer questions with complete honesty
-  Builds confidence
-  Establishes your credibility
-  Do not dwell on unpleasantness
 
Age Specific Needs
 
Infant to 6 months = warmth, security, and nourishment
-  Do not distinguish among caregivers
-  Startled by loud stimuli
-  by pacifier and familiar objects
 
6 months to 2 years = fearful of pain, separation from parents, and limitations in movement
-  Usually require most assertive immobilization techniques
-  Good immobilization techniques are less disturbing than several adults in lead aprons trying to physically restrain
-  Parental participation helpful
 
2 to 4 years = very curious, enjoy fantasy and games
-  Cooperate readily if treated like a game
-  Respond to praise
-  Agitated and aggressive child will not respond to games or other distraction techniques
 
5 years = vary widely
-  Confident children respond well and with advanced maturity
-  Scared children will cling to parent and act much younger
 
6 to 8 years = ideal age for inexperienced radiographers
-  Eager to please
-  Easy to communicate with
-  Very modest

Preteens and adolescents = able to understand

-  Often worried about recovery

-  Need clear explanation and questions answered

-  Sensitive issues arise due to possibility of pregnancy, since menstruation onset varies

-  If possible, female radiographer should inquire about menstruation with this age group
 
Special Needs Patients:
 
Consider age when approaching patients with physical and mental disabilities
-  Over age 8 = child seeks autonomy and independence
Begin communication with child
-  If unsuccessful, talk to parents, but continue to make eye contact with child
-  Children appreciate being talked to, rather than being talked about
 
In emergency situations, maintain calm in tone and manner
-  Keep in mind that parents may speak with tone of anger, urgency – usually from fear and not aggression at you
-  Communicate what to expect during procedure
-  After procedure, explain what may happen next
 
Outpatient is probably easiest, less stressful
-  Lengthy waiting time can cause frustration
-  Communicate cause of delay
-  Listen calmly and sincerely
 
Inpatient is stressful due to degree of illness
-  Child is fearful due to separation from parents, strange environment, etc.
-  Parents are often trying to juggle work, siblings at home, and worry about health of the child
 
Take notes on the following:
-  Specific instructions regarding care and management of child while in department
-  Will a nurse or another health care professional accompany child?

Will physical limitations influence the way the examination is performed

Many inpatients are on a 24-hour urine and stool collection

If diaper is changed in department, save it so floor personnel can weigh and assess
 
Know policy on IV line management
 
-   Often required to call a nurse or for nurse to accompany a pediatric patient with an IV
 
-  Practice standard blood and body fluid precautions
- Adhere to isolation protocols carefully
- Both exist for patient and personnel protection

 Special Concerns including pediatric patients with the following:

Premature infant  -  hypothermia
Myelomeningocele  -  exams should be preformed with patient prone if posible
Omphalocele and gastroschisis - herniated bowel contents must be kept warm
Epiglottitis  -  acute upper respiratory infection treated as an emergency
Osteogenesis imperfecta -  patient very susceptible to bone fractures
Suspected child abuse  -  radiographer should report any suspicions
 

Protection of child from injury:

-  Perform routine safety inspections

-  Supervise children while in department and during transport
 
-  Use immobilization to prevent falls from table
 
-  Inspect immobilization tools
 
-  If injury occurs, file report per protocol
 
Protect from unnecessary radiation
-  Use proper centering, exposure factors, collimation, and proper filter application
-  Use of gonad and breast shields – practical tips provided with each examination in chapter
-  Effective immobilization to reduce repeats
 
Immobilization:
Aside from regular sponges and sandbags, three tools are frequently used in pediatrics
-  Velcro compression band (also called Bucky or body band)
-  Strip of reusable Velcro
-  “Bookends”
-  Pigg-o-stat
-  Octagonal infant immobilization cradle
 
Pediatric radiography requires experience and practice to obtain confidence and competence
 
Rewards are worth the efforts!
 
Anatomy and Positioning of the Hand


Unit Objectives  -  Anatomy and Positioning of the Fingers, Hand and Wrist

At the completion of this unit, the student will be able to:

  1. Identify on both drawings and radiographs all of the anatomical structures of the fingers, hand and wrist.
  2. List all of the names of each carpal bone.
  3. Identify the joints of the fingers, hand and wrist and list the classification of each joint.
  4. Identify and describe the basic projections and central ray locations for the thumb, finger, hand and wrist.
  5. Describe the condition “carpe bossu” and identify the projection which will best demonstrate this condition.
  6. Describe the specialized projection taken for the scaphoid (navicular).
  7. List the conversion factors for radiographing casted extremities.
  8. Position on a fellow student all of the basic projections for thumb, fingers, hand and wrist.
  9. Describe various means of reducing/eliminating motion on radiographs of the hand/wrist.
  10. List reasons why close collimation is important in radiographing the extremities.
  11. Understand the importance of using a small focal spot when radiographing the fingers, hand or wrist.
  12. Identify the reason why it is preferable to radiograph the thumb utilizing an AP versus a PA projection.
  13. Describe the appearance of the anatomical structures of the fingers when a PA oblique hand is radiographed using a sponge finger support versus placing the fingers directly on the cassette.
  14. Describe the difference in the radiographic appearance of the PA wrist when it is radiographed using ulnar deviation (flexion).
  15. Describe the Gaynor Hart Method and identify the anatomical structures which are best seen.
  16. Identify the radiographic position which is the customary projection for the demonstration of foreign bodies in the hand.
  17. Describe the Norgaard Method and Stecher Methods and identify the pathology/condition which is best seen using this projection.
  18. Identify the customary projection of the hand used to demonstrate anterior or posterior displacement of the metacarpals.
  19. Identify various reasons why the carpal bridge projection may be taken.

     Great Websites for learning anatomy of the Fingers, Hand and Wrist:

http://www.assh.org/Public/HandAnatomy/Pages/default.aspx

http://chionline.com/anatomy/anat4.html

http://www.youtube.com/watch?v=Z6jUzWUGcOs  -  Great video for finger, hand and wrist anatomy!

Mobile Radiography

   Mobile radiography uses transportable x-ray equipment to bring imaging services to the patient

  • Commonly performed in patient rooms, emergency departments, intensive care units, surgery and recovery rooms, and nursery and neonatal units
  • Mobile x-ray was first used in the military -Units were carried to field sites
Not as sophisticated as stationary units
   -Vary in power sources (generators) and exposure controls
Typical unit has controls for setting kVp and mAs
   -mAs range = 0.04 to 320
   -kVp = 40 to 130
Power varies between 15 and 26 kilowatts
  • Some machines have preset anatomic programs (APRs) similar to stationary units
  • Automatic exposure control (AEC) is also available for mobile units
  • Mobile units with direct digital capability
  • Flat panel detector connected by a cord or communicates through wireless technology
Three important technical factors must be clearly understood to perform optimum mobile examinations
   -Grid
   -Anode heel effect
   -Source–to–image-receptor distance (SID)
Exposure technique charts are also essential to optimum examinations
 
Grids:
Optimum performance requires grid to be
-Level
-Centered to CR
-Used at recommended focal distance, or radius?Use of grid on unstable surface may cause absorption of primary beam = grid cutoff
 
Anode Heel Effect:
More pronounced at:
-Short SID
-Larger field sizes
-Small anode angles
Short SID and large field sizes are common in mobile
Proper placement of anode-cathode axis with anatomy is essential
 
SID:
Should be maintained at 40 inches (102 cm)
Standardized distance ensures consistent images
Longer SID requires increased mAs, which results in longer exposure time
  -Increases risk of imaging motion
 
Technique Charts:
Should be available for every machine
Should display standard technical factors for all projections performed with the machine
Caliper should also be available for accurate patient measurement
 
Radiation Safety:
Mobile radiography produces some of the highest occupational radiation exposure for radiographers
Protection for self, patient, and other personnel critical
Wear a lead apron
Stand as far away from patient, tube, and beam as possible
 
Minimal safe distance is 6 feet (2 m)
Least exposure is at right angle to patient and primary beam
Distance is single most effective radiation protection measure

 Inform all persons in area that exposure is going to be made

  -Advise persons to move back at least 6 feet (2 m) from patient and/or tube
  -Provide lead aprons for those who cannot leave room
 
Shield patient’s gonads
   -When x-raying children
   -When x-raying persons of reproductive age
   -On patient request
   -When gonads lie in or near useful beam
   -When shield will not interfere with anatomy of interest
Minimum source-to-skin distance is 12 inches (30 cm)
 
Isolation Considerations:
Two types of patients in isolation
  -Those who have contagious infectious microorganisms
  -Those who must be protected from exposure to infectious microorganisms (reverse isolation)
Wear all required protective apparel for specific situation
Wash hands before gloving
Protect IR with protective cover
 
After procedure, discard protective apparel according to protocol
Wash hands
Wear clean gloves to clean equipment and use appropriate aseptic technique
Wash hands after removing gloves
 
Performance of Mobile Exams:
Plan for trip out of department
Gather all necessary devices
-IR
-Grid
-Tape
-Caliper
-Markers
-Sponges
Check battery charge on battery-operated units
Inadequate charge affects output and image quality
-Before entering room with machine, check patient identity and examination to be performed
-Communicate with nursing staff for proper patient care
Obtain nursing assistance, if necessary
Introduce yourself to patient when entering room
Explain procedure
Observe medical equipment
-IVs
-Chest tubes
-Catheter bags
Ask family and visitors to step out of room until examination is finished ?Move chairs, IV poles, wastebaskets, and other objects out of path of machine
If patient is to be examined in supine position, move base of machine to middle of bed
If patient is to be examined seated upright, position base of mobile unit at end of bed
For lateral and decubitus positions, place base of mobile unit parallel or perpendicular to bed
Make sure collimation is not open larger than IR size
Check CR and IR alignment to prevent distortion
Use consistent system for keeping exposed and unexposed IRs separate
Keep log of procedures, time of examination, and technical factors for image identification (ID)
 
Assessment of Patient Condition:
Allows necessary adaptation of procedure to ensure quality patient care and image
assess
-Alertness
-Respiration
-Ability to cooperate
-Limitations to procedure
 
Patient Mobility:
Never move a patient or part without assessment of ability to move or ability to tolerate movement
Check with nursing staff or physician to obtain assistance and permission to move a part that has had surgery or is fractured
Inappropriate movement can further injure patient
 
Fractures:
There are a wide variety of fractures and therefore a wide range of patient ability to assist with procedure
Key is to be cautious and gentle and to obtain plenty of assistance for patient safety and comfort
 
Interferring Devices:
Orthopedic beds, fracture frames, tubes, wiring, etc., produce artifacts
Experienced radiographers know which objects can be moved and which require procedure modification to obtain the image
Some procedures may have to be performed with the object in the image
Get assistance if unsure whether an object can be moved
 
Positioning and Asepsis:
 Warn patient of potential discomfort of IR
   -Cold
   -Hard
IR can damage skin of older patient
-Use cloth or paper cover to reduce risk of injury
Protect IR from contamination by use of appropriate impermeable cover

 IR cover makes positioning easier because cover does not stick to skin

Mobile radiographic examinations include:
 
Chest
Abdomen
Pelvis
Femur
Cervical spine
Neonate
 
AP Chest:
 
Patient position
-Dependent on condition
-Ranges from seated upright, to semiupright, to supine
Part position
-Midsagittal plane (MSP) in center of IR
-IR top 2 inches (5 cm) above relaxed shoulders
-No leaning or rotation
 
CR
-Perpendicular to long axis of sternum and IR
-Enters approximately 3 inches (7.6 cm) below jugular notch at level of T7
Exposure made on inspiration, unless otherwise requested
-If respiration assistance is provided, watch patient’s chest to determine inspiratory phase